Saturday, February 11, 2017

How to Fix a Low Flowing Faucet

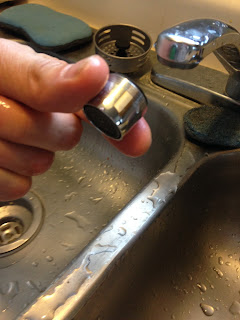
Before you call a plumber out to look at your faucet that doesn't seem to be flowing well check the aerator on the faucet. Our kitchen sink had terrible water pressure and only came out in a small trickle. Super annoying! Initially I removed the aerator and cleaned out a lot of sediment that had been built up but when I put it back on it didn't seem to change anything. Then I tried to clean it really well and that didn't help either. So I headed to the hardware store to buy a new one. 

Usually you can unscrew the aerator with just your bare hands but apparently I put it back on too tight. So use your hand or whatever tool you need to get your old aerator off. 

 The new aerator we bought had threads on the inside and outside of it to fit any type of faucet. When you put the new aerator on make sure to only use your hands to tighten it!
 Look at that! The new aerator we bought cost less than $5. We have had the new aerator on for almost a week now and we haven't had any problems with our water pressure. Hooray for simple fixes!

Create More Space in a Small Closet for Less than $10

The house that we bought is over 100 years old! So a lot of things have been retro-fitted to make the house up to code. One thing that has been added to each of the bedrooms is a closet. The rooms themselves are on the smaller side so the closets are small as well. We needed to be able to put a lot of things in the closet (clothes, shoes, toys) but it was too small and looked unorganized. So we decided to create more space.
Because the closet was tall we decided we could add another bar beneath the existing one to create more room for clothes to hang. The closet was 38 inches wide and the bar we purchased from Home Depot was only 36 inches wide. So we added a 2 inch block on one side to make up the difference. In most closets this will be the case.

I installed the block and one end of the bracer first. Insert the closet bar to make sure the bar is level. Then mark on the opposite wall where the other bracer needs to be to keep the bar level.

Ta Da!!!
 Instead of having clothes crammed in the closet with no room to move we now have so much more space! We made sure to hang the bar high enough so that we could still store some boxes and toys in the bottom of the closet without getting in the way of the clothes. I love that it looks more organized and my daughter loves that she can hang up most of her clothes now! After everything was installed we figured out that all of this cost less than $10. That makes me happy and my wallet happy!

Wednesday, February 8, 2017

How to use Beeswax Polish on Unfinished Wood

When we bought our house I was so excited to get settled in our own space again. For the past 2 years we have been living in parents/in-laws homes or an apartment. Prior to that we lived in our own condo but decided to rent that out when we moved out of state. Anyways, it finally came time to buy a home again and stay put for a while. I had a semi-long list of furniture items that I wanted for the house. One of the main things was a good kitchen table. I wanted a real wood table but we are not made of money and I didn't really want to spend a whole lot on one. So I did what I do best and started comparing prices and tried to figure out where we could get one. To my dismay I couldn't seem to find anything. Then we happened to stop at IKEA for a few things, and of course you have to go through the maze that is their showroom in order to find one simple item. We ended up in the table section and were surprised with what we found. I had not been in an IKEA in a long time and they have really improved on their quality. In one room I had at least 4 options of tables that were real wood and well within my budget. We ended up going with an unfinished rectangle table. I really liked the idea of having a table I could  make my own. If I didn't like it then I could change it down the road. Probably what really sold me on it was the price, our table was only $69!

INGO table from IKEA: $69


IKEA sells their own line of beeswax polish and glazing paint so you can finish your table the way you want. I purchased the clear polish to keep the natural look of the wood.

 Here is how I did it:


The beeswax polish just makes the untreated wood more durable. Because I decided to go with the clear polish my prep was very minimal. I wiped my table down with a dry rag and was ready to paint. However, some unfinished wood pieces require some light sanding, especially if you decided to use a glazed paint or finish stain. I opted to use a wider paint brush to cover more surface area and to hopefully cut down on the time I spent painting the table.


The beeswax polish has a clear honeycomb sticker on the top. Don't be fooled by the paint glaze that will have colored stickers on top. When I opened the jar I was a little concerned because it looks milky white but I promise you it will dry clear. I think it's a white milky color to help you know where you are painting.

On the jar it will tell you to apply a thin coat. It took a lot of product to get a thin coat! The polish was really easy to apply and there was very little odor. I didn't have to worry about not overlapping or wiping any excess off like I would have had to with regular stain. In the end I decided to apply two coats of polish. Wait the recommended 12-24 hours before applying your second coat. The finished look does not look very different from the beginning picture and the table still has an unfinished feel to it but if anything spills on it I can wipe it up without leaving any kind of residue or stain.

Overall I love the look of our table. 

Tuesday, February 7, 2017

How To Make Your Linoleum Floor Look Like New Again

Have you ever moved into an apartment or a new house and there is linoleum flooring that looks terrible? We just bought a house that was a rental for a while and we have linoleum flooring in the kitchen and bathroom. To say that the flooring was dirty is an understatement. We aren't doing and major renovations right now so I had to do something about the floors. Even to walk on them barefoot made my skin crawl. So, off to the store I went! If you don't want to buy an expensive steamer and are willing to get on your hands and knees to scrub and save some money here is what you will need:


I scrubbed my entire kitchen floor and bathroom floor so I used a lot of Pine-Sol and Dawn soap. In a large glass bowl I pour at least 2 cups of Pine-Sol and a long squirt of Dawn soap into the bowl. Then I added the hottest water I could get out of my kitchen sink. Mix with the scrub brush. The scrub brush I used was super cheap. But I picked one that had really stiff bristles. That way as I was scrubbing I didn't have to put as much effort into it.  I started in one corner of my floor and worked my way out. Then with a large towel I wiped everything up. I am so happy with the end result and my floors don't feel grimy anymore. If someone were to stop by they probably wouldn't be able to tell a difference but I know and that's all that matters!

Take a look at my before and after:


Tuesday, January 31, 2017

Welcome

Do you ever find yourself with an idea? It might be something simple but at least you have an idea. Then, do you find yourself talking your way out of said awesome idea? I do.🙋 All the time. Funny thing is, I use to not be this way. If I had an idea or I wanted to do something I did it. Im not quite sure where things turned around but they did. So I decided I need to change this. This will be my space for all of my ideas. All of things I want to do I will try and do them and post my experiences here. It may be a DIY project, a new recipe, a craft or even a new hair style. I may even have a few tips or tricks to share with you! Most importantly this will be my space to prove to myself (and anyone who reads this) that I CAN DO things. Because... If I can do it, you can do it!

-M